
Snookie Tutorial From GlowPinkStah

Aveda Was Backstage at ORGANIC at by John Patrick
- Brush through hair and prep with Aveda Phomollient™ Styling Foam to add body and shine. Use a comb to create a left side part.
- Divide hair into four sections: sides, back, and top. Fold the top section over the face and clip back to separate.
- Backcomb the back section of hair with a brush to create messy volume. Spray liberally with Aveda Control Force™ Hair Spray for maximum hold.
- Create an anchor by crossing bobby pins horizontally across the middle of the back section of hair, just below the crown of the head.
- Using large hair pins, attach a hairdresser's sponge at the crown, where bobby pins are anchored.
- Cross the right section of backcombed hair over to the left, pinning over the hairdresser's sponge with large hair pins. Repeat with the left section of backcombed hair, bringing it to right. Take all remaining hair in the back section and twirl to the left to create a French twist. Secure the twist at the nape of the neck with hair pins, creating a tail of loose hair draped over the shoulder.
- Set aside a portion of hair to fall in front of the left ear, and brush remaining top section of hair over the hairdresser's sponge, Pin it into the French twist to create a “pouf.” Pull lightly with fingers to create loose, spontaneous volume. Spray with Aveda Control Force™ Hair Spray.
- Leave wisps of free falling hair in front of the left ear, and loosely pin remaining pieces above the right ear. Finish with Aveda Control Force™ Hair Spray.

A Video Tour of Susan Posnick Cosmetics: Part One
While in Dallas last month, I had the amazing opportunity to visit Susan Posnick's office and studio. You may best know her as the amazing mineral cosmetic line, and I had the chance to get the insider's view, along with a fabulous makeover. There are several videos in this series, and this one begins, well, at the beginning. Enjoy!

Halloween Video Tutorials: Lauren Luke's Angel Fairy Eyes
I'm sharing some of my favorite Halloween video tutorials with you for the next few days. Enjoy!
How To: The Perfect Blow Out
I don't really like paying a small fortune to get my hair blown out. I know it's hard work, and I doubt I could ever get my hair looking as fabulous as it did when I walked out of Blow in New York City (mere hours before I came down with H1N1, so the whole effect was pretty much lost) (but major props to my girl Michelle, who turned me on to it!). But let me tell you girls, with some practice and some good advice, you can get a rockin' blow out going on, and still have some dollars in your wallet to spend on something else.
Before you get started, you need to assemble your tools. If you don't already have them, consider investing in the following essential tools: a 1875 watt blowdryer (I recommend the Rock Star 1875W Tourmaline Ionic Ceramic Dryer
Once you have all your tools assembled, wash and condition your hair. If your hair is very dry or damaged, consider a deep conditioner like Ojon's Restorative Hair Treatment
Next, section your hair and clip with the duckbills or jaw clips. I like to section out the top or crown of my head, each side, and two sections in the back, one along my neckline and one above that. Starting with whichever section you prefer - I always begin in the back, because the hair along my nape is the curliest and the frizziest - with your blow dryer on it's highest setting, remove any remaining moisture, and then use your round brush to pick up a two inch section of hair. Remember, styling hair well always includes two things: heat and tension. Using your brush, pull your hair away from your head (straight out will give you more volume) with your brush, and move the blow dryer and the brush slowly down your hair until it reaches the end of the strands. Do it again if it isn't as smooth as you would like.
At this point, if you're feeling adventurous, you can do what I do and roll the hair all the way up on the brush and apply direct heat with the blowdryer for about 30-45 seconds. Unroll hair gently, and twist the brush on the way out. You'll have a nice large curl for your efforts.
Some people recommend using a cold shot of air on your newly blown out sections. I've never done it, but I've seen it recommended often. Just FYI.
Move methodically through the sections of your hair. I like to start at the bottom and work up. Don't undo each section until you're ready to get to it, and use your clips to move half of the section out of the way. This entire process really shouldn't take you longer than 15 minutes, and that's if your hair is longer than mine is.
After you have blown out all your sections, use your spray glosser to add a bit of shine and depth. Run your hands through your hair, and you're all set. You can also throw in velcro rollers at this point if you want more bounce and curl. Let them set for about 10 minutes, spray with some hairspray (I swear by Jonathan's Finish Control High Shine - Aerosol hairspray
Do You Know the Difference Between All the Eyeliners?

Pencil liners come in two basic forms, with variations on each: soft and hard. A hard pencil gives you a straight solid line with little to no smudging and is excellent for lining hard to reach areas such as the waterline of both the lower and upper lids. These liners are designed to give you a clean precise line similar to liquid liner, but can be difficult to use or tug on gentle eye skin. Soft pencils generally have some form of emollient, such as wax, to ease the application process. These pencils are designed to give you a medium-thick line which is easily smudged for a more smokey look. Sometimes they wear off quickly, which can be a problem.
Liquid liner is all about intensity. It gives a very precise line, anywhere from thin to thick, and can be especially useful for the cat-eye look. There are many types of liquid liners on the market, from matte black to sparkly glitter. Many people find these liners a bit intimidating to use, especially at first, as the application process can be tricky. But practice and a good technique can get even the shaky-handed a great look.
Powder liners are fairly new on the scene, and are often found in mineral makeup lines, although many people have been using eye shadow as powder liners for years. Applied with an angle brush, these have amazing versatility; you can create a soft wash of liner or go for a more hard-edged look. These are generally not appropriate for wear on the waterline, as the powder could irritate the eye.
Soft pencils can offer versatility, while liquid and hard pencils are good for dramatic precise looks. Powder liners, such as L’Oreal’s new Bare Naturale are excellent for those who want a natural look. The truly savvy beauty junkie will probably have several of each kind in her makeup stash!
Photo by dreamglow on Flickr.
Real Woman Tutorial: Bright Eyeshadow - Beauty Bubbles
Yes, you can wear teal shadow without looking garish -- just follow these steps |
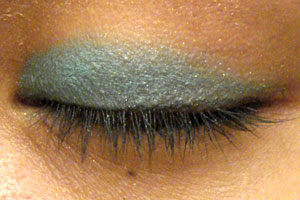
This tutorial is designed to show you step-by-step how to wear bright colored eyeshadow (which is doable even if you have small or Asian eyes). Brightly colored eyes can dress up a look when paired with a neutral or nude face, or accessorize an entire outfit. Just make sure you know how to wear it before rocking it in the office. |
Ask Me Mondays: Wrapping Hair
Q: I'm not African-American, but I have very thick, coarse, curly hair that I straighten. A friend of mine told me that I could avoid the flat iron every day by wrapping my hair, but I don't know what that is. Help!
I love it when my readers force me to learn new things! I have thick, coarse hair that requires constant straightening too, and I didn't know anything about it. However, an hour spent on the intertubes and asking people that I know paid off! I have a new beauty routine to add to my evening.
Basically, wrapping your hair is just that: taking your (usually longer, but not always) hair and literally wrapping it around your head, then tying it with a scarf before bed. It seems like everyone does this differently, and there is no real "right" way to do it.
Before you begin, you might consider having the following items on hand: wide-toothed comb, stiff (but not plastic) bristled brush, duckbill clips, a glossing spray, and a silk scarf.
To begin, spray hair with glossing spray or spray-in conditioner, and make a part down the back of your head, as if you were making pigtails. Starting on one side (whichever side you choose), start combing your hair clockwise around your head, gathering hair as you go. Depending on how thick your hair actually is, this might start looking like a beehive - that's totally fine. No worries, since you're not going out for the evening. Keep wrapping your hair around your head literally in a circle. If you need to, use clips to keep hair in place. Some people will clip hair at the hairline to keep strays where they need to be.
Next, grab your scarf and tie it tightly around your head, making sure no strays are poking out. Pull any clips out (if you're like me, and can't stand anything pushing into your head when you're sleeping) and take yourself on off to bed. In the morning, you can unwrap your hair and find that it doesn't need any straightening whatsoever.
I hope this helps!
Beauty Bytes: Classic Pin Up Girl Makeup Tutorial
TotalBeauty.com content: |
Dita Von Teese's makeup artist shows you how to master her look for Halloween |
To win the "sexiest costume" award this Halloween, copy this bombshell makeup look. Here, Gregory Arlt, director of makeup artistry for MAC Cosmetics, shows you step by step how to recreate Dita Von Teese's signature makeup. Finish off the look with a black glam wig and '40s inspired dress. |
Beauty Bytes: Halloween Makeup Tutorials
TotalBeauty.com content: |
From a sexy Victoria Beckham look to a gothic Vampira, watch these videos to make costume creation a cinch |
Not sure what to be this Halloween? How about Amy Winehouse, a twinkling fairy, Twiggy or Dita Von Teese (aka classic pin-up girl). Don't want to get that fussy? Paint-on a masquerade-like mask or create a sexy cat look in minutes. We've got step-by-step guides to all of these Halloween costume ideas. |
Eyeshadow Master Class
Eye Shadow Master Class
Sometimes it's good to go back to the basics. I always appreciate a good tutorial - even if you're the best at applying your makeup, I guarantee you can always pick up a tip or two from a good tutorial.